Imagine growing your own fig tree from a simple cutting with minimal effort. This method is not only innovative but also incredibly easy, requiring just a 2-liter plastic bottle and a few basic materials. No complicated tools or processes—just straightforward steps to help you cultivate a thriving fig tree right at home.

Materials You’ll Need:
- A 2-liter plastic bottle
- Sand or well-draining potting mix
- Fig tree cuttings (6–8 inches long, with visible nodes)
- Rooting hormone (optional, for better results)
- A sharp knife or scissors
- Rubber bands or twine
- A misting or spray bottle
Step-by-Step Guide to Propagating Fig Trees

1. Prepare Your Cuttings
Choose healthy fig tree cuttings that are about 6–8 inches long, ideally with at least one or two nodes. Nodes are critical for root development. For faster results, dip the cuttings in rooting hormone before proceeding.
2. Modify the Plastic Bottle
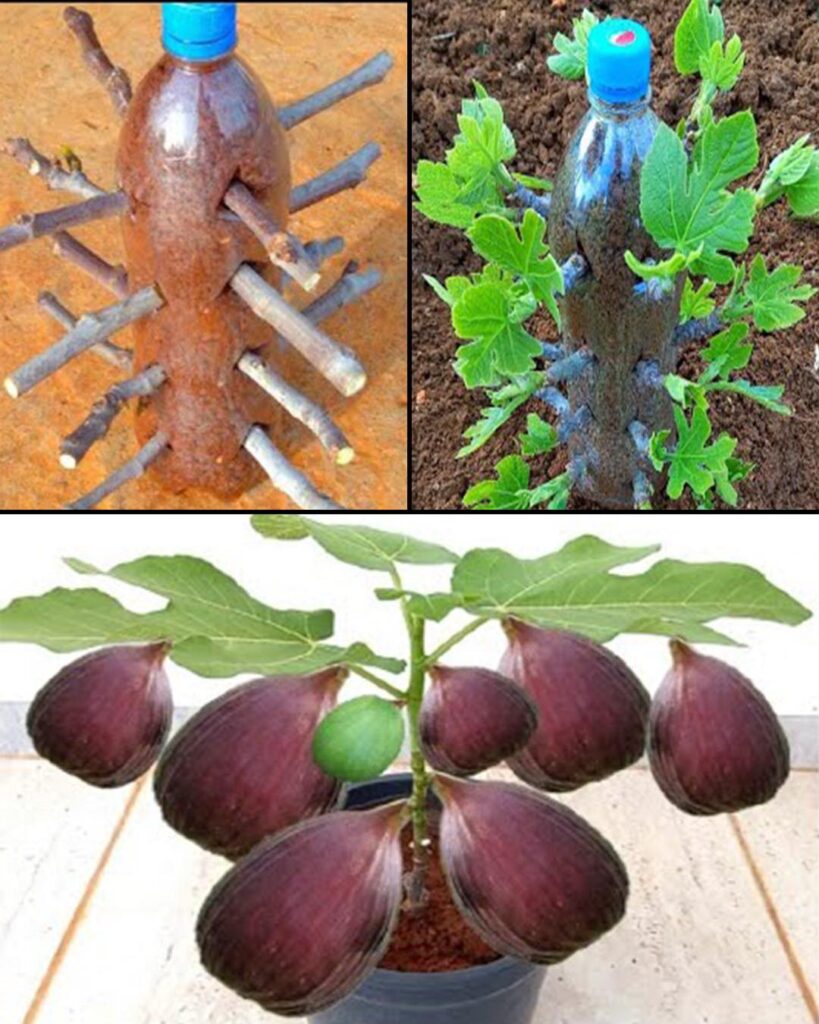
Take your 2-liter plastic bottle and carefully cut “+” shaped openings on the sides. These slits should be large enough to hold the fig tree cuttings without allowing them to slip through.
3. Insert the Cuttings
Carefully place each fig cutting into the prepared openings, ensuring the nodes are inside the bottle while the top part of the cutting remains exposed. The bottle will act as a miniature greenhouse, retaining warmth and moisture around the cuttings.
4. Create a Greenhouse Effect
Cover the top of the bottle with plastic wrap or a plastic bag, then secure it with rubber bands or twine. This will maintain humidity and provide the ideal conditions for root formation. Place the bottle in a bright spot with indirect sunlight, as direct sun can overheat the cuttings.
5. Maintain Moisture Levels
Consistent moisture is crucial for successful propagation. Regularly mist the interior of the bottle and the cuttings using a spray bottle. This prevents them from drying out and helps sustain an optimal environment for root growth.
6. Monitor Root Growth
Check your cuttings periodically for root development. Gently tug on each cutting; if you feel resistance, it means roots are forming. This process may take several weeks, so patience is essential.
7. Transplant Your Cuttings
Once the roots are well established, carefully remove the cuttings from the bottle and transplant them into individual pots with quality potting soil. Alternatively, you can plant them directly into your garden. Ensure they receive adequate sunlight, water, and care as they grow into healthy fig trees.
Why This Method Works
This propagation technique uses the plastic bottle to mimic a greenhouse, which creates a humid and warm environment—perfect for encouraging root development. The simple setup makes it ideal for beginners and those who want a low-maintenance way to propagate plants.
Final Tips:
- Be Patient: Root formation can take a few weeks, so don’t rush the process.
- Avoid Overwatering: While moisture is key, excessive water can cause rot. Keep the environment damp, not soggy.
- Choose the Right Spot: Place your setup in a location with bright but indirect light to avoid overheating.
Growing fig trees from cuttings has never been easier or more satisfying. This method is hassle-free, affordable, and perfect for gardeners of all skill levels. Whether you’re a novice or a seasoned green thumb, this propagation technique will have you growing robust fig trees in no time.
Try it today, and share the joy of fig tree propagation with friends and family!


