Vermicomposting is a fantastic way to transform kitchen scraps into nutrient-rich compost while contributing to a sustainable environment. By following this simple guide, you can set up your own homemade vermicomposter using an efficient three-tote system. Not only will it reduce waste, but it will also provide your garden with top-notch organic fertilizer.

Materials You’ll Need
- Three sturdy plastic totes (Roughneck totes are recommended for durability)
- One lid for the totes
- A cooler drain or similar device for liquid drainage
- A drill with a quarter-inch bit
- Bricks or blocks for elevation
Step-by-Step Instructions
1. Prepare the Totes
Begin by drilling quarter-inch holes across the bottom of two of the totes. These holes allow worms to move freely between layers and ensure proper drainage.
Next, drill holes around the upper edges of these totes to provide essential aeration. Proper airflow is crucial for maintaining a healthy composting environment.
2. Set Up the Drainage System
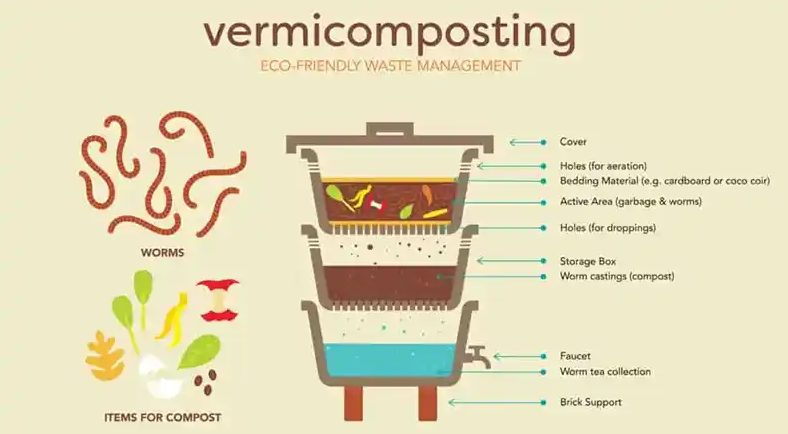
Designate the third tote as your drainage collector. Install the cooler drain on the recessed side of this tote to facilitate easy removal of excess liquid, commonly known as “worm tea.” This nutrient-rich liquid can be collected and used as an excellent natural fertilizer for your plants.
3. Assemble the Vermicomposter
Stack the two totes with drilled holes above the drainage tote. These top two layers will serve as the living and working quarters for your worms. Start by adding bedding material and food scraps to the uppermost tote, creating the initial composting layer.
4. Add the Worms
Carefully introduce your worms into the top tote, including their current bedding and food scraps. Over time, as this tote fills with worm castings, you’ll move it to the middle position, creating a rotational system where the top tote becomes the active layer.
5. Maintain and Harvest
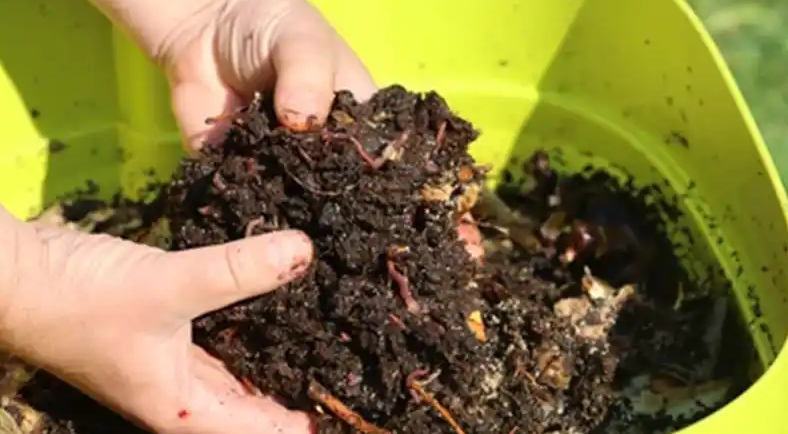
Continue adding kitchen scraps and fresh bedding to the new top tote. The worms will naturally migrate upward in search of food, leaving behind fully processed, nutrient-dense compost in the lower tote.
Once the middle tote is entirely filled with worm castings and free of worms, you can harvest the compost and use it to enrich your garden soil.
Regularly check the bottom tote for worm tea, draining and storing it for use as liquid fertilizer.
6. Elevate the System
Position the entire vermicomposter setup on bricks or blocks. This elevation makes drainage easier and allows for convenient access to each tote.
Tips for Success
- Feeding Your Worms: Provide a steady diet of fruit and vegetable scraps, coffee grounds, and eggshells. Avoid adding meat, dairy, or oily foods, which can attract pests and create unpleasant odors.
- Maintaining Moisture: Keep the bedding material slightly damp but not soaking wet. If the system becomes too dry, lightly mist it with water.
- Preventing Odors: Aeration and the right mix of food and bedding ensure a fresh, earthy smell. If odors arise, check for excess food buildup and adjust moisture levels.
Why Try Vermicomposting?

This three-tote system is a cost-effective and sustainable way to recycle organic waste, producing high-quality compost and liquid fertilizer. Whether you’re an experienced gardener or a beginner, vermicomposting allows you to reduce waste while nurturing your plants with rich, organic nutrients.
By incorporating vermicomposting into your routine, you’re taking a meaningful step toward a greener, more sustainable lifestyle. Give it a try and enjoy the rewards of healthy plants and a thriving garden.
Feeling inspired? Share this guide with friends and encourage them to join the composting revolution!


